How to take dishwasher out: a complete removal guide
Learn how to take dishwasher out safely with a step-by-step method. This guide covers safety checks, tools, disconnection of water and power, and post-removal tips to prevent leaks and damage.

To take dishwasher out safely, unplug the unit, shut off the water, disconnect the supply and drain hoses, remove mounting screws, and slide the appliance forward. Plan for two people, a towel, and a bucket to catch spills. Keep hoses supported to avoid kinks, verify the circuit is off with a tester, and label connectors for easier reinstallation.
Safety first: assess and plan before you take dishwasher out
If you’re planning to take dishwasher out for maintenance or access to the wall behind it, safety comes first. Unplug the unit, switch off the circuit at the breaker, and ensure you have a clear path to the work area. The Dishwasher Tips team recommends preparing towels and a bucket to manage any residual water. According to Dishwasher Tips, verifying power and water shutoff directions before touching any connections minimizes the risk of shocks and floods. This initial assessment sets the stage for a smooth removal and protects your home from accidental spills.
Why you might need to take the dishwasher out
There are several legitimate reasons to move a dishwasher: cleaning the space behind it, inspecting drain lines for clogs, resealing a loose wall connection, or accessing electrical junctions for a repair. Dishwasher Tips analysis shows that most removals are routine maintenance or installation adjustments rather than urgent repairs. Understanding the goal helps you prepare the right tools, avoid unnecessary disconnections, and reconnect everything correctly when you reinstall.
Tools and materials you’ll need
Before you start, gather supplies and organize them within easy reach. Essential tools include an adjustable wrench, a screwdriver set, pliers, a voltage tester, towels, and a bucket. Optional items like zip ties or clamps help secure hoses during removal. Keep a notepad and marker handy to label hoses and connectors. Having everything ready minimizes delays and reduces the risk of forgetting a connection as you pull the unit out.
Prep steps and safety reminders
Set aside plenty of time for the entire process and arrange a helper if the dishwasher is heavy. Wear non-slip shoes and gloves for grip and protection. Clear the floor, remove nearby items that may snag hoses, and ensure pets or children are away from the work area. The goal is to create a clean, obstacle-free zone so you can move the appliance without damage to walls or cabinets.
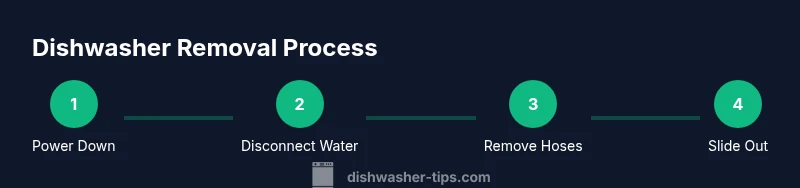
Step-by-step overview (high level) before you dive in
Review the sequence: power off, water shutoff, disconnect hoses, remove mounting screws, back away from the wall, and inspect behind the unit once loosened. This overview helps you anticipate where each connection lives and avoids surprises as you pull the dishwasher forward. The steps are straightforward, but staying organized is key to a clean removal and reinstallation.
Disconnecting power safely
First, locate the power source and unplug the dishwasher at the outlet. If your unit is hardwired, switch off the dedicated circuit at the breaker panel. Use a voltage tester to confirm there is no current before touching any wiring. Keep the power cord in view but out of the way to prevent snagging during removal.
Shutting off water and disconnecting the inlet hose
Turn the water shutoff valve clockwise to stop supply. Use a wrench to loosen the coupling on the water inlet hose, then gently detach it from the supply line. Place a towel under the connection to catch any remaining water. Inspect the hose for wear; replace if cracked or bulging before reinstallation.
Disconnecting the drain hose and securing lines
Loosen and detach the drain hose from the wall stub or garbage disposal inlet. Be prepared for some backflow—keep a towel handy and direct water into the bucket. Gently guide the hose away and secure it to prevent kinks or tangling as you move the unit. Label drain connections if needed to simplify reattachment later.
Removing mounting brackets and pulling the unit forward
Most dishwashers are held in place by mounting screws or brackets to the cabinet front or underside. Remove these fasteners with the proper screwdriver or bit, keeping screws in a labeled container. With the brackets released, have your helper guide the unit forward as you support the weight. Slide it evenly to avoid scratching walls or cabinetry.
Final checks and cleanup after removal
With the unit free, inspect the cabinet interior for leftover debris or damaged gaskets. Check behind the appliance for any signs of water damage or loose connections. Store the dishwasher in a safe location if you’re planning a temporary move; otherwise, prepare it for reinstallation by retracing your steps in reverse order and labeling each connection for accuracy.
Tools & Materials
- Safety gloves(Protect hands during cutting, lugging, and disconnecting hoses)
- Voltage tester(Verify no live current before handling wiring)
- Adjustable wrench(Loosen water inlet fittings and clamps)
- Screwdriver set (Philips and flathead)(Remove mounting brackets and screws)
- Pliers(Grip and remove hose clamps easily)
- Towels or absorbent rags(Catch leaks and protect cabinetry)
- Bucket(Catch water when disconnecting hoses)
- Marker and labels(Label hoses/connectors for reinstallation)
- Non-slip footwear(Stable footing while moving heavy appliance)
Steps
Estimated time: 45-90 minutes
- 1
Power down and unplug
Locate the main outlet or disconnect at the circuit breaker. If you use a plug-in unit, unplug it entirely. Use a voltage tester to confirm no current is present before touching any wiring.
Tip: Double-check the outlet behind the sink or under the counter where the plug may be tucked. - 2
Shut off the water supply
Close the kitchen shut-off valve(s) to stop incoming water. If you have a dual valve, close both sides to ensure no water reaches the hose. Have towels ready for any residual drips.
Tip: If the valve is stiff, apply a brief WD-40 spray and wait 1–2 minutes before turning. - 3
Disconnect the water inlet hose
Using the adjustable wrench, loosen the inlet hose fitting at the valve. Detach the hose from the dishwasher side and direct any remaining water into the bucket or tub.
Tip: Hold the hose above the bucket to avoid splashing. - 4
Disconnect the drain hose
Detach the drain hose from the wall or disposal inlet. Expect some water to drain out; keep towels ready and move the hose away from the cabinet while detaching.
Tip: If the hose is hard to reach, loosen clamps with pliers or a screwdriver gently. - 5
Remove mounting brackets or screws
Locate and remove the screws/brackets that secure the dishwasher to the cabinet. Keep screws in a labeled container for easy reinstallation.
Tip: Take a photo of bracket positions before removing for reference. - 6
Gently pull the unit forward
With help, carefully slide the dishwasher out a few inches from the wall. Support the weight as you tilt the front slightly downward to avoid scraping the floor.
Tip: One person supports the front, the other guides the back end. - 7
Check connections and prepare for storage
Inspect behind the unit for signs of damage or leaking hoses. If you’re storing the unit, keep it on a soft surface and cover to prevent dust from entering the cabinet.
Tip: Label any exposed connections to simplify reattachment later.
People Also Ask
Can I take out a dishwasher by myself, or do I need a helper?
A single person can remove a dishwasher, but a second person greatly reduces the risk of injury and damage to cabinetry. If you must work alone, move slowly and ensure you have a stable support for the unit.
You can do it alone if you take your time and stay safe, but a helper makes it easier and reduces risk.
What safety checks should I perform before starting?
Check that the circuit is off, water is shut, and the area is clear. Have towels, a bucket, and a flashlight ready. Use a voltage tester to confirm no power before touching wiring.
Make sure power is off, water is stopped, and the work area is clear before you begin.
What are common mistakes when removing a dishwasher?
Rushing the disconnects, pulling cables, or failing to secure hoses can cause leaks or damage. Label connections and take photos to prevent misattachment during reinstallation.
Common mistakes include rushing and not labeling connections, which can lead to leaks later.
Is it necessary to call a pro if I encounter a stuck motor or hard-to-reach bolts?
If bolts are seized or wiring looks damaged, it’s safer to call a pro. Exposed wiring or persistent leaks require professional assessment.
If you’re unsure or something looks damaged, it’s best to call a professional for safety.
What should I test after reinstallation?
Reconnect hoses, restore power, and run a short test cycle with the unit empty to check for leaks. Inspect all connections carefully after the test.
Run a test to ensure there are no leaks and that the unit functions properly after reinstalling.
What if my dishwasher is built-in and not meant to be removed easily?
Some models are fixed with complex brackets. Consult the manual or a professional if you’re unsure to avoid damaging cabinetry or plumbing.
If it’s a built-in with complex brackets, consider professional help rather than forcing removal.
Watch Video
What to Remember
- Always unplug and shut off water before touching any dishwasher connections
- Label hoses and take photos to aid reinstallation
- Move slowly and use a helper to prevent damage to cabinetry
- Inspect behind the unit for leaks and plan proper storage or reinstallation