How to Fix Dishwasher Pod Latch
A practical, safe, and thorough guide to diagnosing and fixing a dishwasher pod latch, with tools, step-by-step instructions, tips, and maintenance for reliable dispenser operation in 2026.

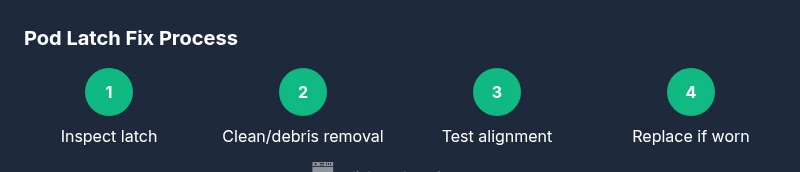
By following these steps, you’ll restore the pod latch so the detergent door closes reliably. Start by powering off the dishwasher, then inspect the latch for wear or jam, clean any debris, reseat components, and test with an empty cycle using a pod. If the latch remains loose, replacement may be necessary.
How to fix dishwasher pod latch: core concepts
If you’re researching how to fix dishwasher pod latch, you’re aiming at the small, critical part that governs when the detergent pod is released. The latch assembly sits at the dispenser door and coordinates with the wash cycle to keep the door closed and the pod released at the right moment. A healthy latch prevents overflow, leaks, and incomplete cleaning caused by an early or late pod release. In many homes the culprit isn’t a single worn piece but a combination of wear, debris buildup, and occasional misalignment from door movement. Dishwasher Tips emphasizes that a careful diagnosis saves time and often avoids unnecessary part replacements. In 2026, homeowners report longer latch life when they clean the housing, lubricate moving parts with a dry lubricant, and reseat components after each service. This section outlines the philosophy: diagnose safely, work with clean hands, and document the cause before buying parts. The guidance here applies to most common latch designs, including plastic housings and metal levers; however, model-specific instructions may vary, so consult your manual for latch type and replacement part numbers.
Before you touch any internal components, unplug the unit or switch off the circuit at the breaker. Use gloves to protect your hands and keep a small tray handy for screws. This disciplined setup makes subsequent steps safer and faster.
Common failure modes of pod latches
Pod latch assemblies fail for several reasons that users can recognize with a quick inspection. A worn spring or cracked plastic latch will fail to hold the dispenser closed during the cycle, causing pods to cling to the door instead of releasing properly. Debris from the tub, misaligned door edges, and accumulated detergent residue can jam the lever or trap the catch in the open position. In some units, the latch housing has developed hairline cracks or the metal pin has become loose, producing a wobbly latch that won’t engage. Dishwasher Tips notes that humidity and mineral build-up in hard water can accelerate wear. Understanding these patterns helps you decide whether cleaning, realignment, or a full replacement is the right path. If you notice any unusual cracking, clicks, or inconsistent pod release during cycles, start with a thorough visual check before attempting tools.
Key warning signs include incomplete closure, erratic pod release, or visible damage to the latch components.
Safety-first: prep and workspace setup
Before you touch any internal components, unplug the dishwasher or switch off the circuit at the breaker. Wear protective gloves to avoid sharp edges and place a small parts tray on the floor to keep screws from wandering. Remove the toe-kick panel or the lower access panel according to your model to reveal the latch housing. Keep a flashlight handy to inspect the inner workings, and never spray liquids directly into the latch area. Use a dry, lint-free cloth to wipe away residue and avoid pushing debris deeper into the mechanism. A calm, well-lit workspace reduces the risk of losing small parts and reduces the chance of damaging the dispenser during disassembly. If you must lean on the door, do so gently and support the chassis to prevent bending
Diagnostic checklist before you replace parts
Use this quick checklist to determine whether you should clean or replace the latch. Check the external door alignment by closing gently and noting if the latch catches smoothly. Inspect the latch for visible cracks, bent tabs, or a loose hinge. Test the spring tension by applying light pressure to the lever—if it folds or sags, replace it. Look for sticky residues around the latch channel and clear them with a dry cloth. If you can operate the latch manually with steady resistance and it returns to neutral, the issue is likely wear rather than a binding foreign object. If the door seals and tub gasket are intact, the problem is almost always localized to the latch mechanism. If you’re unsure, consult your manual or Dishwasher Tips troubleshooting guide for part numbers.
Document your findings with a quick photo log to compare before and after.
Repair options: fix vs replace vs professional service
Many latch problems are solvable with cleaning, realignment, or a simple spring replacement. If your latch shows cracks, a bent lever, or a loose catch, replacement is usually the most reliable option. Before buying a new latch, verify compatibility with your dishwasher model and confirm whether you need a complete latch assembly or only a contact pin. In some cases, a lubricated hinge and a thorough cleaning restore function for a season; however, lubrication alone won’t fix a worn spring. For busy households, a professional service can ensure correct alignment and prevent future leaks. The decision often comes down to cost, availability of parts, and the likelihood of recurring jams. Dishwasher Tips suggests weighing the long-term cost of repeated repairs against the price of a replacement module. If you’re planning how to fix dishwasher pod latch, verify that the replacement part matches your model number and fit.
If you’re unsure about compatibility, contact the manufacturer or a qualified technician before purchasing parts.
Maintenance tips to extend latch life and avoid future jams
Regularly inspect the dispenser area for detergent residue and wipe with a dry microfiber cloth after each cycle. Keep the latch clean and free of mineral buildup by running a maintenance cycle with a removal of pods or detergent blocks. Use a dry lubricant on moving metal parts and avoid oil-based sprays that can attract grime. If your dishwasher uses hard water, consider a rinse aid strategy to reduce mineral deposits. Finally, record the model, latch type, and replacement dates in a notebook or digital log; this practice makes future repairs faster and reduces guesswork. Scheduled inspections every 3–6 months can dramatically reduce surprise failures.
Tools & Materials
- Owner’s manual for your dishwasher (model specifics)(Helps locate latch type and replacement parts)
- Screwdriver set (Phillips and Torx)(Use the correct bit to avoid stripped screws)
- Needle-nose pliers(For clips, pins, and small parts)
- Soft cloth or microfiber towel(For cleaning debris without scratching)
- Dry lubricant or silicone spray(Avoid petroleum-based sprays; use sparingly)
- Replacement latch kit(Only if inspection shows wear or damage)
- Multimeter (optional)(If you suspect electrical contact issues)
- Magnetic tray or small parts organizer(Keeps screws in order)
Steps
Estimated time: Total time: 40-60 minutes
- 1
Power down and unplug
Turn off the dishwasher at the breaker or unplug from the outlet. This prevents electric shock and protects the control board during inspection. If you must work while the power is on, use extreme caution and keep water away from any electrical contacts.
Tip: Double-check that the cord isn't plugged in before starting. - 2
Access the latch assembly
Remove the toe-kick panel or lower access panel to reach the dispenser door and latch housing. Use the correct screwdriver to remove screws and keep track of fasteners in a tray. Do not force the dispenser cover; check for hidden clips first.
Tip: Label each screw position to simplify reassembly. - 3
Inspect latch components
Look for cracks, bent tabs, loose pins, worn springs, and abnormal movement when manually actuating the lever. Note any misalignment with the dispenser door and check for trapped debris in the latch channel.
Tip: Take a photo log to document wear before replacing parts. - 4
Clean and realign
Wipe away detergent residue and mineral buildup with a dry microfiber. Realign any misaligned parts; verify that the latch snaps into place without binding. If you see corrosion or significant wear, move to replacement.
Tip: Avoid liquids that could seep into the control housing. - 5
Test the latch
Close the dispenser door and manually operate the latch while observing its engagement. Run a no-load cycle to ensure the pod is released at the correct time. If the cycle completes with proper latch action, you’re close to done.
Tip: Keep hands clear of moving parts during the test. - 6
Decide on replacement
If the latch remains loose or exhibits persistent wear after cleaning, replace the latch or entire dispenser module. Confirm compatibility with your exact model before purchasing.
Tip: Consider professional service for complex assemblies or warranty concerns.
People Also Ask
What is a dishwasher pod latch?
The pod latch holds the detergent pod in the dispenser until the wash cycle begins. A faulty latch can prevent proper pod release and lead to inefficient cleaning.
The pod latch holds the detergent pod until the wash starts. If it’s faulty, the pod won’t release correctly, affecting cleaning.
Can I fix it myself?
Yes, many technicians and homeowners repair pod latches with basic tools. Safer results come from following the steps, keeping power off, and verifying compatibility before replacement.
Yes, you can fix it yourself with basic tools. Always power off first and check compatibility before buying parts.
How do I know if it needs replacement?
Signs include visible cracks, a loose or wobbly latch, persistent jams, or repeated failure after cleaning and realignment.
Look for cracks, looseness, or repeated jams even after cleaning. Those suggest replacement might be needed.
Should I unplug the dishwasher during repairs?
Yes. Unplugging or turning off the circuit is essential to avoid electric shock and protect the control board.
Absolutely unplug or switch off the circuit before starting any repair.
Are there safety risks I should know about?
Risks include electric shock, water exposure to electronics, and sharp edges on metal panels. Work in a dry area and wear gloves.
Watch for electric shocks, water contact with electronics, and sharp edges. Wear gloves and keep the area dry.
How long does latch replacement take?
Time varies by model, but plan for about 30-60 minutes if you have the part ready.
Expect roughly half an hour to an hour, depending on access and whether you replace just the latch or the whole dispenser.
Watch Video
What to Remember
- Power safety first; unplug before opening panels.
- Diagnose wear, not just dirt; check springs and cracks.
- Choose repair or replacement based on durability and cost.
- Test thoroughly after reassembly to prevent jams.