My Dishwasher Is Not Draining: Troubleshooting Guide
If your dishwasher won't drain, this expert troubleshooting guide helps homeowners diagnose clogs, hoses, and pump faults. Learn safe fixes, step-by-step checks, and when to call a pro.

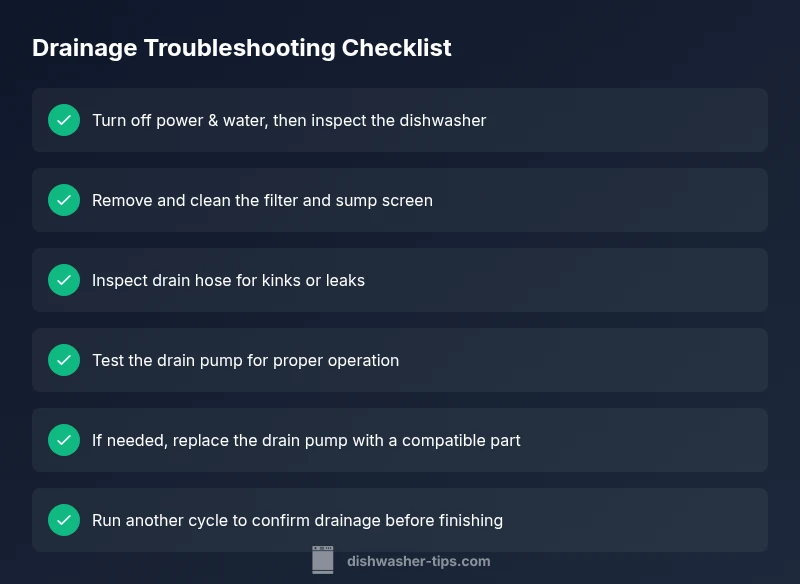
Most likely, your dishwasher isn’t draining due to a clogged filter, a blocked drain hose, or a faulty drain pump. Start by unplugging the unit, removing and cleaning the filter and sump, then inspect the drain hose for kinks. If the issue persists, test the drain pump or call a professional.
Understanding Why Your Dishwasher Won’t Drain
When a cycle ends with standing water, the first step is understanding where the water should have gone. A dishwasher’s drain path generally runs from the tub through a filter and sump into a drain hose that leads to the sink or disposal. When any link in this chain is blocked or damaged, water remains in the cavity. Notably, many cases of not draining are mechanical rather than electronic. According to Dishwasher Tips, most homeowners can fix the issue with a few deliberate checks and cleanups. If you feel uncertain at any point, err on the side of safety and pause work until you can confirm power is off and the water supply is isolated.
In this guide we’ll walk through common causes, how to verify them, and safe, incremental fixes. Start with the simplest checks and move toward components that require more hands-on work. If you hear unusual noises from the pump or if water still won’t drain after basic cleaning, that’s a signal to seek professional help. This approach aligns with practical, home-friendly diagnostics you can perform without specialized tools.
Check the Obvious First: Filter, Pump, and Sump
The simplest path to a fix often lies in the basics. Start by removing the lower rack and locating the filter assembly at the bottom of the tub. Pull out the coarse filter and, if accessible, the fine mesh screen. Rinse away food debris, gunk, and any buildup from the sump cavity. A clogged filter is a frequent culprit when water remains. After cleaning, reassemble and run a short test cycle with nothing in the dishwasher to observe whether draining improves. If not, move to the drain path. In a notable finding, the drain pump can fail gradually, producing a slow or partial drain rather than a complete halt.
Dishwasher Tips emphasizes consistency: routine cleaning reduces the likelihood of clogs forming in the filter and sump. Document any recurring patterns—time since last clean, the type of detergent used, and whether the issue happens with certain loads—as these details help when diagnosing with a technician.
Inspect the Drain Hose and Sink Connection
Next, inspect the drain hose that exits the dishwasher and connects to the sink or garbage disposal. A kinked or crushed hose prevents water from moving freely. Look for sags that create a low point where water can pool. Ensure the hose is looped high enough under the countertop to prevent backflow and that it is secured to prevent accidental disconnection. Check for any leaks or cracks along the hose length. If you have a disposal connection, verify the knockout plug has been removed and that the disposal is not blocked. A properly positioned hose and clean connections are often enough to restore drainage.
If you discovered a blockage in the hose, clear it by flushing with water and, if safe, using a long flexible brush or pipe cleaner to loosen debris. Do not use sharp objects that could puncture the hose.
Examine the Drain Pump and Motor
If the filter and hose appear clear, the drain pump is the next likely component. A humming pump without effective draining can indicate a motor fault or seized impeller. Listen for the pump’s motor sound during a drain cycle. A weak hum or no sound at all may indicate power is not reaching the pump or a failed component. Inspect the wiring harness for loose connections and check fuses or the control board if accessible. Replacing a pump is more involved and often requires a model-specific part. If the pump seems functional but still no drainage, the issue may lie upstream in control electronics or a faulty sensor.
Safety note: Disconnect power before inspecting electrical components. If you’re unsure, proceed with caution and consider professional diagnosis.
Hidden Causes: Garbage Disposal, Air Gap, and Plumbing
Backflow from a garbage disposal or an air gap can create drainage problems for the dishwasher. If your sink’s disposal is connected, ensure the disposal does not back up into the appliance. An air gap should be clear of debris; rinse it with warm water to dislodge any buildup. Plastic debris in the drain lines or a clog further down the plumbing stack can also affect drainage. If other fixtures in the home drain slowly, you could have a venting or line blockage that affects multiple outlets. In these scenarios, a professional plumber may be needed to address the main line or venting issues.
One practical check: run hot water down the sink to ensure the drain line is clear and observe whether the dishwasher drains more effectively after the sink clears.
Tools, Safety, and Quick Prep
Before diving deeper, assemble a basic kit: a bucket, towels, a flashlight, a screwdriver set, pliers, and a flashlight. Have safety gear handy—gloves and eye protection—because water can be dirty and ducts or electrical components are involved. Always unplug the dishwasher and shut off the water supply before any disassembly. Keep a towel on the floor to catch spills and consider laying a drop cloth to protect surrounding cabinets. These precautions help prevent accidents and make troubleshooting smoother.
Step-by-Step Fix: From Easy to Hard
This section lays out a practical sequence of actions to diagnose and fix the problem, starting with the easiest steps and progressing to more involved tasks. By following this order, you can confirm a simple cause or identify parts that need replacement. If at any point you feel uncertain, pause and contact a professional.
- Turn off power and water to the dishwasher. Remove the lower rack for access. 2. Remove and clean the filter and sump screen; rinse under running water until completely clear. 3. Reconnect and run a quick drain test to see if water exits the tub. 4. Inspect the drain hose for kinks or blockages; straighten and flush with water. 5. Listen for the drain pump during a drain cycle; test if possible with a multimeter or by observing for motor rotation. 6. If water still remains, consider replacing the drain pump or seeking professional help.
When to Call a Professional and What to Expect
If you have completed basic cleaning and hose checks but the dishwasher still doesn’t drain, it’s time to contact a professional. A technician can perform a diagnostic test of the pump, check the PCB for faults, and assess any complex clogs within the drain line or disposal connections. Expect a diagnostic fee and an estimate for parts and labor. Explaining what you’ve already checked—filters, hose condition, potential disposal or venting issues—helps shorten the service time. Dishwashers vary by model, and some require specialty tools to reach internal components.
Prevention: Keeping Your Drain Clear for the Long Term
Regular maintenance reduces the likelihood of drainage problems. Clean the filter and sump at least monthly if you run the dishwasher frequently, or every 2-3 months for lighter use. Use the recommended detergent and avoid overflowing the tub with debris-rich items like rice or pasta. Run a hot water rinse before starting a cycle if your dishes are particularly dirty. Periodically inspect drain hoses for cracks and replace them if needed. A proactive approach helps you keep your dishwasher draining smoothly, saving time and avoiding costly repairs. According to Dishwasher Tips, small, consistent maintenance yields big long-term benefits.
Steps
Estimated time: 30-60 minutes
- 1
Power off and access panel safety
Start by unplugging the dishwasher and turning off the water supply. Remove the lower rack to gain clear access to the filter area. This initial safety step prevents accidental shocks or leaks while you inspect components.
Tip: Double-check that the unit is completely disconnected before touching any internal parts. - 2
Remove and clean the filter and sump
Take out the coarse filter and any fine screens. Rinse under warm water, using a soft brush to remove stubborn debris. Reinstall once clean and ensure the filter seats properly to prevent debris from bypassing it.
Tip: A clean filter dramatically reduces clog risk and helps water drain more efficiently. - 3
Check the drain hose for kinks
Follow the hose from the dishwasher to the sink or disposal. Look for folds or pinch points. If needed, straighten the hose and ensure it is installed with a high loop to prevent backflow.
Tip: Avoid crushing the hose when reassembling; secure with appropriate clamps. - 4
Inspect the drain pump area
With power off, inspect the pump housing for signs of wear or debris. Listen for a steady hum during a drain cycle; absence or intermittent sound may indicate a pump issue.
Tip: Check the wiring harness for loose connections and secure any loose wires. - 5
Test the drain pump function
If you have access to a multimeter, test the pump coil resistance according to the model’s service manual. If the pump fails an electrical test or shows signs of mechanical wear, replacement is recommended.
Tip: Some pumps require professional installation for warranty compliance. - 6
Reassemble and perform a test run
Reinstall all components, restore power and water, and run an empty cycle to observe drainage. If water still remains, escalate to the next level of troubleshooting or a professional repair.
Tip: Keep towels handy in case of spills during testing.
Diagnosis: Dishwasher won't drain water after cycle
Possible Causes
- highClogged or dirty filter and sump
- highBlocked drain hose or kinked hose
- mediumFaulty or worn drain pump
- lowGarbage disposal connection or air gap issue causing backflow
Fixes
- easyClean filter, remove debris, and scrub sump screen
- easyStraighten and clear the drain hose; run water to test flow
- mediumTest pump operation (listen for motor hum; check wiring); replace if needed
- hardInspect disposal inlet and air gap; ensure proper connection or consult pro
People Also Ask
Why is my dishwasher not draining?
Common causes are a clogged filter, a blocked drain hose, or a faulty drain pump. Start with the simplest checks and work toward the components that require more effort. If the issue remains after basic cleaning, consider professional help.
Commonly, not draining comes from a clogged filter, blocked hose, or failing pump. Start with easy checks and then move to harder parts if needed.
How do I check the dishwasher filter?
Remove the lower rack and locate the filter assembly. Take out the coarse filter, rinse it under warm water, and scrub away debris. Reassemble and run a short test cycle to check drainage.
Open the bottom, pull out the filter, rinse it, and reassemble to test drainage.
Can a kinked drain hose stop draining?
Yes. A kinked or crushed drain hose blocks water flow. Straighten the hose and ensure it has a proper loop. If the hose is damaged, replace it.
A kink in the hose can stop draining; straighten or replace as needed.
What if water remains after a cycle but there’s no error code?
This can indicate a blocked filter, hose, or pump issue rather than a fault code. Check the basics first, then test the pump if needed.
If water stays and there’s no error, start with cleaning the filter and hoses, then check the pump.
Should I call a professional?
If basic cleaning and hose checks don’t resolve the issue, or if you’re uncomfortable with electrical tests, a professional can diagnose pumps, controllers, and leaks safely.
If you’re unsure after the basic checks, it’s wise to call a pro.
Are chemical cleaners safe for my dishwasher?
Avoid aggressive chemical cleaners inside the dishwasher; they can damage seals and components. Use manufacturer-approved cleaners or follow care guidance.
Avoid harsh cleaners inside the dishwasher—use manufacturer-approved products.
Watch Video
What to Remember
- Start with simple checks: filter and hose first
- Ensure drain hose has a proper high loop to prevent backflow
- Test the drain pump if visible symptoms persist
- Don’t ignore slow or no-drain symptoms—address early
- Call a professional if electrical tests or parts replacement are needed