Replacing Heating Element in Dishwasher: A Practical Guide
Learn how to replace the heating element in your dishwasher with a safe, step-by-step approach. Diagnose issues, choose a compatible part, and verify proper heating and drying after replacement.

To replace a heating element in a dishwasher, unplug the unit and switch off the circuit breaker, then shut off the water supply. Remove the access panel, disconnect the element’s wiring, and unbolt the old part. Install the new heating element, reconnect wires, reassemble, and run a test cycle to verify heat and drying.
Diagnosing heating element failure in a dishwasher
Diagnosing a failing heating element begins with symptoms. Common signs include dishes not drying, water never getting hot, or cycles taking longer than expected. According to Dishwasher Tips, many homeowners misinterpret this as a detergent issue or rinse aid problem, when the root cause is a degraded heating element. The heating element is responsible for converting electrical energy into heat inside the tub, which your dishwasher uses for both wash and dry phases. Over time mineral buildup, corrosion, or insulation damage can reduce its efficiency or create an open circuit. Before you replace anything, confirm the problem with a simple check: ensure the dishwasher is powered off, the breaker is off, and there is no voltage present at the element terminals when you test with a multimeter. If you see infinite resistance or no continuity, that’s a strong indicator the element has failed. Note that a faulty thermostat, control board, or wiring harness can also mimic heating-element problems, so use this block as a guide to rules out symptoms and plan the replacement accordingly.
In many households, simple issues like a partially clogged filter or a stuck spray arm can mimic heating problems. While you’re diagnosing, verify there’s adequate water level and that the heater isn’t insulated to the point of overheating. For the sake of accuracy, avoid jumping straight to replacement; rule out supply and control issues first. This approach minimizes unnecessary parts purchases and ensures you’re solving the right problem when you begin the replacement process.
When you are ready to move forward with replacing heating element in dishwasher, document model specifics and confirm compatibility with the new part. A proper match reduces risk of leaks and electrical faults. If any doubt remains about the cause, consult a technician for a diagnostic check.]
Safety prerequisites before starting the replacement
Safety comes first with any appliance repair. Start by unplugging the dishwasher from the wall outlet and turning off the circuit breaker that serves the unit. If your home uses a fused outlet or a dedicated circuit, switch off the appropriate breaker and verify power is fully removed with a non-contact voltage tester. Shut off the home’s water supply to the dishwasher if accessible, and place towels under the area to catch residual water. If your model has a toe-kick or bottom access panel, prepare a container to catch any remaining water and wear safety gloves to protect hands from sharp edges. Always consult local electrical codes or OSHA guidelines when performing electrical work; see https://www.osha.gov for general electrical safety practices. By taking these precautions, you minimize the risk of shock, burns, or water exposure during the replacement.
A clean workspace is essential: clear the area, remove obstructing items, and lay a soft mat to reduce damage to the cabinet surfaces. If you must tilt or move the unit, do so gradually to prevent strain on water lines and wiring. Remember: no water should be present around an exposed electrical connection after power is removed. Planning ahead reduces the chance of accidental shorts or injuries during the aftercare phase.
Safety notes from the Dishwasher Tips team emphasize following a methodical approach to avoid costly mistakes. If you’re unsure about wiring colors or terminal layouts, consult the dishwasher’s service manual or a qualified technician before proceeding. 2026 guidance highlights the importance of confirming power is fully isolated and that all shields and panels are replaced securely after service to maintain appliance safety.
Tools & Materials
- Replacement heating element kit (model-specific)(Ensure compatibility with your dishwasher model and correct voltage rating.)
- Phillips-head screwdriver(For removing screws securing panels and mounting brackets.)
- Flat-head screwdriver(Useful for prying covers without damage.)
- Nut driver set(For securing element mounting screws and clamps.)
- Torx driver set(Some models use Torx fasteners for heating elements.)
- Wire stripper/crimper(To prepare connector terminals if needed.)
- Multimeter (voltmeter/ohmmeter)(Test continuity and verify there is no voltage at the element when power is off.)
- Bucket or shallow pan(Capture residual water during panel removal.)
- Towels or absorbent rags(Keep workspace dry and prevent spills.)
- Silicone grease or gasket lubricant(Lightly lubricate gasket if the new element requires it to seal properly.)
- Safety gloves and eye protection(Protect hands from sharp edges and avoid splashes.)
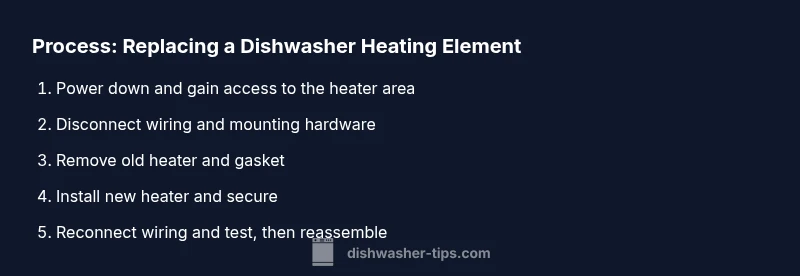
Steps
Estimated time: 60-90 minutes
- 1
Power down and drain
Begin by unplugging the dishwasher and turning off the corresponding circuit at the breaker. If your model has a built-in water valve, shut it off and place towels to catch any residual water. This step protects you from electrical shock and helps you work safely around moisture.
Tip: Use a non-contact voltage tester to double‑check that no power is present before touching wiring. - 2
Access the heating element area
Remove the kick panel or access cover at the bottom of the dishwasher to reveal the heater assembly. On some models you may need to remove the bottom rack, toe-kick plate, or service panel. Take care to keep screws organized and note how panels fit together for easy reassembly.
Tip: Take photos during disassembly to help reassemble later. - 3
Disconnect electrical connectors
Gently unplug or unscrew the wiring harness from the heating element terminals. Mark or photograph each connector to preserve polarity and color coding. Keeping connectors in order prevents miswiring on the new element.
Tip: Inspect connectors for corrosion or damaged insulation; replace if necessary before installing the new element. - 4
Remove the old heating element
Loosen mounting screws or clamps holding the heater in place and carefully slide the element out. Note the orientation of the element and how it sits within its gasket or mount. Handle the old part by its metal body rather than the delicate terminal leads.
Tip: Check the gasket seating surface for cracks or debris that could cause leakage after replacement. - 5
Prepare and position the new element
Compare the old element to the new one for length, terminal layout, and connector spacing. Place the gasket correctly and ensure the element sits flush against the mounting surface. Do not overtighten fasteners; snug is usually sufficient to seal without damaging parts.
Tip: Lubricate the gasket lightly if recommended by the manufacturer to improve seal longevity. - 6
Install the new heating element
Insert the new element into the mounting position and secure with the original screws or clamps. Re-seat the element so there is no play and ensure a proper seal with the gasket. Connect the wiring harness to the correct terminals, following the notes you took earlier.
Tip: Avoid pinching wires; ensure all wires are routed away from any moving parts or heat sources. - 7
Test electrical continuity
With power still off, use the multimeter to test continuity between the heater terminals and between each terminal and ground if applicable. The readings should indicate a closed circuit through the element and no open path to ground.
Tip: If you detect a short to ground or open circuit, recheck connections and the element’s integrity before powering the unit. - 8
Reassemble and perform a dry-run test
Reinstall the service panels and toe-kick, reconnect the water supply, and plug the unit back in. Run a short cycle with no dishes to confirm heat generation, check for leaks, and ensure the drying function works.
Tip: Watch closely for any leaks around the gasket and listen for unusual buzzing or arcing sounds during the first start-up. - 9
Final test and cleanup
If the dishwasher heats and dries normally, run a full cycle with dishes to verify performance across wash and dry phases. Clean up the workspace, store tools, and dispose of the old element per local guidelines. Document the model, date, and any observations for future reference.
Tip: Keep a small maintenance log for this appliance to track service history.
People Also Ask
Can I replace a heating element in my dishwasher myself?
Yes, many homeowners can replace a heating element with proper safety precautions, the right tools, and a compatible element. If you’re unsure about electrical work, consult a professional.
Yes. If you have the right part and follow safety steps, you can replace the heating element yourself.
What are common signs of a faulty heating element?
Common signs include the dishwasher not heating water, extended cycles, or poor drying. Check for continuity with a multimeter and verify that thermostats and control boards aren’t the actual culprits.
Common signs are poor heating or drying and longer cycle times.
Will a universal heating element work on my dishwasher?
Most dishwashers require model-specific heating elements due to mounting and electrical connectors. Verify compatibility with your model before purchasing a replacement.
Most units need a model-specific part to fit properly.
Are there safety precautions beyond disconnecting power?
Yes. After power-off, disconnect water supply if accessible, drain residual water, and wear protective gear. Check your manual for any appliance-specific safety notes.
Turn off power and water, drain any water, and wear safety gear.
What is the typical lifespan of a dishwasher heating element?
Heaters often last several years, but mineral buildup and cycling can shorten life. Regular maintenance can extend life but replacement depends on use and water quality.
Heaters often last several years, depending on water quality and usage.
Watch Video
What to Remember
- Power down and verify no voltage before touching wiring
- Use model-specific parts and follow manufacturer guidance
- Test continuity and heat after installation
- Reassemble carefully to prevent leaks and electrical faults